Are you excited to join me on this new learning adventure? I AM!
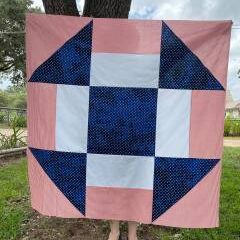
I will be honest with you – I have never applique’d. Well…I take that back – I made this.

I needed a quilt for my oldest’s birthday party to hang on the wall last year. That was her request since her baby sister had her baby quilt hung in the same spot on the wall for her birthday decor. Jameson wanted a deer themed birthday party in purples and turquoise colors. Ever try to find that online? It’s near impossible with a practical price tag!
So I put my thinking cap on and decided I would make large blocks in her purple and turquoise colors, 3 blocks across and 3 blocks down. That would be about the right size, 36″ x 36″. I took strips of fabrics that she likes in various sizes and sewed them together to make a larger block.
Then I found an image of a deer on Pinterest (of course, right!) and I printed it out on printer paper. I trimmed the image and then traced the image on the fabric – INVERTED – and then cut out with scissors. I then glued the deer image (fabrics) onto the larger blocks of the quilt.
I went back over the block with a straight stitch around the edges of the applique’d deer heads.
Outcome? Jameson loved it and that’s all that matters. Was it perfect? Nope. Was it a great experience? Yes. I’m hoping that as we learn about applique this year, that you get a great experience and enjoy learning a new technique with me.
So let’s start with GiGi the Giraffe from Pattern Poole Patterns of Australia. Have you ever heard of them? My Hubby’s Aunt Kathy told me about them and I got to meet them at Quilt Market in Houston this past year. This past year? Yep…it’s 2020. It will take me some time to process that in itself, LOL.

If you are in the United States, well, North America for that matter – you may want to consider purchasing your Pattern Poole Patterns from the Shop page. Shipping alone may be costly for you if it’s coming from Australia. See a pattern on their website but NOT on the Shop page? Let me know and I can order it or check my inventory for you. Pattern Poole is a wonderful company. It’s a mother-daughter team and they design applique patterns, sewing patterns, and even handbags! #Supportsmallbusinesses
They even have a Facebook group to share the joy of Pattern Poole. Check out this group and join it today.
Back to Gigi…Did you order your pattern for this adventure yet? If you have it, open it up!
If you don’t – order it off the Shop Page! It’s on sale right now.
The directions are excellent, however, I’m going to try a different method while I make this.
I made a copy of the original – so I could practice and make sure it would work before cutting my original pattern. I simply made a xerox copy of the inverted pattern pieces. I keep these in same envelope that the original pattern .

I then took the inverted pieces, and laid them on the fabric and used a fabric marking pen (in my case a #2 pencil) to trace around the pattern piece. Then I used a pair of scissors to cut them out. I marked my fabric on the “wrong” side (so it was right side down facing the cutting mat and wrong side facing up at me). I checked my pattern piece with Page 1 of the pattern (design layout) to make sure I had it the way I wanted it on the fabric (fussy cutting).
Let’s talk fabrics…honestly, this was the hardest part was selecting which fabrics I wanted to use. I thought I could use some scraps, but it didn’t look right. I went through all of my scraps last year and consolidated which scraps would go into my scrap quilt and so what was left was not viable. So I checked out my fabric batiks from CSM (Cantik Cottons & Batiks) – and I love it. You can see the main two batiks I used are available in the SHOP now! The background fabric is also available!


Not just any ole’ scissors, but the TIM HOLZ with a tiny zig zag in the blades. These were highly recommended to me by Tana Mueller – applique extraordinaire. Using these scissors gives your fabric enough of a zig zag that it won’t fray and you can keep it as a raw edge. BONUS FOR US BEGINNERS, RIGHT? If you don’t have these, you need them.

I think I purchased these – the small ones – for around $12.00 at my local quilt shop.
Once the fabric is cut out, I’m laying the fabric pieces onto the design layout page (page 1 of the pattern). I then stacked the pattern pieces back into the pattern envelope so I would not lose them. I do have a wild three year old who likes to take my stuff while I sew and run off with it…laughing. Laughing directly in my face because I was totally involved in my sewing project and she snuck in like a ninja. She will even run off yelling “I’m a ninja!” in the cutest three year old voice…while laughing at me.
Now that all of the pattern pieces are cut out, I start laying out the design on the fat quarter that we are using as the background fabric of this wonderful creation we are making.

Some people may be concerned because they don’t see any Steam A Seam, or another form of fusible attached to the fabrics ready to be attached to the background fabrics. Well, I wanted to try another way. I’m going to use Elmer’s School Glue to the back of the pieces of fabric to adhere to my background fabric. I’m going to use a super hot iron without steam to set the pattern onto the fabric. Let’s see if this works. I’ve tried this method piecing quilt blocks, if you remember and it worked AMAZINGLY WELL! I’m very excited to try this with applique.
I’m taking an entire Fat Quarter of fabric to use as my background. I will trim it down to size later once I have my pieces secured to it. I usually trim as the very last thing to do.
I then laid out the pieces on my background, starting at the bottom and working my way up. I worked in sections, so I started with the neck and once it was the way I wanted it – I then went back to each piece and added a little of Elmer’s School Glue on the back and on the edges and then put it back in it’s place on the fabric. I then applied a very hot iron (WITHOUT STEAM). The fabric pieces set in place.

It really is that easy!
Once the pieces are set on the fabric – you can go back and do a decorative stitch or a simple straight stitch (like me!) around the edges to permanently secure your new work of art!
It took me longer to write this post then actually creating Gigi. LOL.
Happy Quilting!
2 Comments
Leave a Comment
Sign Up For Our Exciting Quilting Newsletter
New Registrants will Receive a Coupon Code for 15% Off Their Next Purchase!
Sign Up For Our Exciting Quilting Newsletter & Get a Coupon Code for 15% Off Your Next Purchase!

About Sew Much Charm
I enjoy gardening, quilting, sewing, & cooking as a relatively new stay-at-home mom of two girls.
I make custom handmade quilts for clients and recently decided to learn how to sew garments for my little girls. Watch my journey & learn from my mistakes.
Sign up for the awesome newsletter and get all the exciting news first. Sign up today!
Important Information
Disclosure and Disclaimer
View Cart
Update My Account
Site By Apache Interactive
Follow Us
You can follow Sew Much Charm on several social platforms. News, contests, block-of-the-month and special offers are announced on these platforms as well as this blog.
Be sure to sign up for our newsletter for even more great information and deals.


Great commentary . Clear and easy to understand I may try the glue stick method ! Of course any thing is better than appliqué pins😹😹😹😹😹I know lots of ways to get blood out as a long time appliqué person . I really liked the clear instructions .
Thank you so much!